Renovating osamasidat.com, Part 1: Migrating to Wintersmith
This is first part of a (hopefully) multi-part series of posts in which I outline my thought process as I renovate my personal website.
Introduction #
Back in February, I developed a website for the BabySteps project using the static site generator Wintersmith. Previously, all of my websites and webpages had simply been “hand-written” in raw HTML, CSS, and if necessary, JavaScript.
While working on the BabySteps website, I learned a fair bit about the ease of design and development that Wintersmith provided me, along with the advantages of static site generators in general. I liked the separation of concerns, namely, content and design, and made a note to myself that I would continue to explore static site generators for future similar sites. Since my personal webpage is in need of a fresh redesign, I decided to make it a candidate for this experiment.
Goals of the renovation #
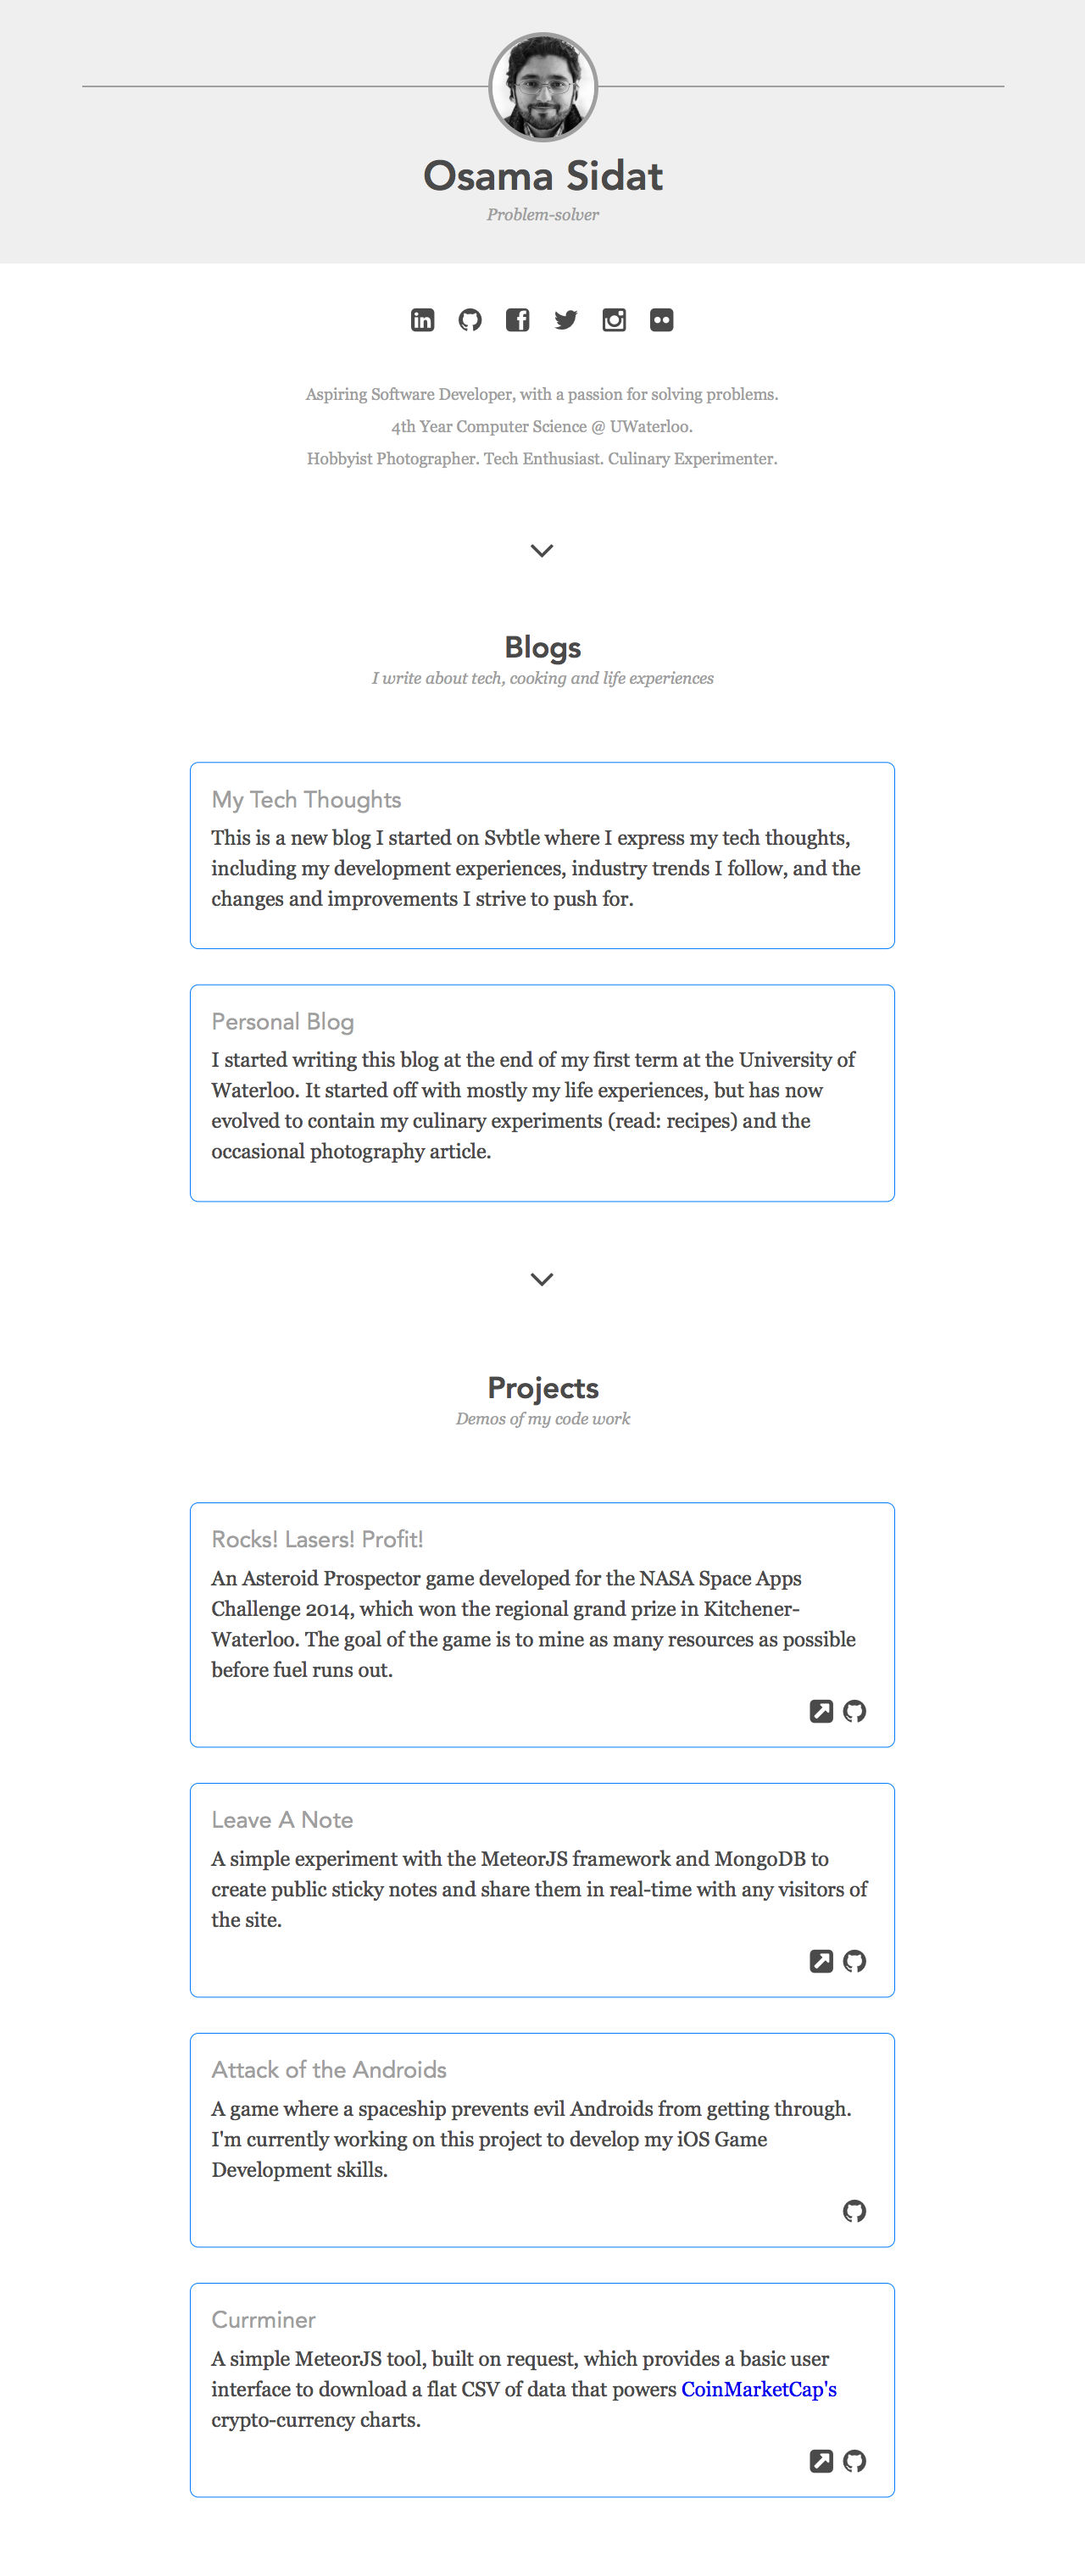
Currently, my website is composed of a single webpage, as seen below (full page screenshot taken using Fireshot on Mozilla Firefox):
I have three broad goals for this renovation project.
- Migrate to Wintersmith. The objective is to separate content and design, which will be done through substituting raw HTML and CSS with Jade, SCSS and JSON.
- Move the website from hosted storage on Netfirms (positively ancient!) to GitHub Pages for more streamlined deployments. Currently, my “deployment process” equals copy-pasting files via FTP.
- Redesign. Overall, I want the website to be cleaner, better-looking, faster-loading, and slightly more functional from a user perspective. I’ll be honest, I’m not entirely sure about the details of the means and the ends of this goal.
As far as timeline goes, I’m not really assigning one to myself. I’ll be working on the project and this (the blog post) as I get time.
Why Wintersmith for this project? #
Honestly, it’s more about personal preferences than anything else. I can outline a few of those.
- NodeJS-based instead of Ruby-based (like the more popular Middleman and Jekyll). I’m currently exploring more of the Node world.
- Jade template support, by default. I’ve used ERB, HAML and Jade across previous projects, and the latter is my favorite.
- Obvious: past experience with Wintersmith. Instead of mucking around configurations and other setup stuff with others, I can immediately move my focus to writing clean template code, and eventually, redesign.
Without further ado, lets start… #
Migrating to Wintersmith #
Note 1: My work on this project can be viewed through the commits I make on its GitHub repository.
*Note: The next steps assume an already-installed instance of Wintersmith and its dependencies. For help, check out the Wintersmith GitHub Repo.
Setting up a new Wintersmith Project #
The current personal-page directory looks like this:
├── README.md
├── images
│   └── osama.png
├── index.html
└── style
    ├── fa (...) // directory for font-awesome
    └── style.css
In case something goes wrong, I would like to return things to this exact state. Hence, I’ll add tags using git:
$ git tag v1.0 master
$ git push --tags
Next, while inside the personal-page directory, I’ll create a new empty wintersmith project.
First I tried:
$ wintersmith new . -T basic
Unfortunately, that didn’t work out (Wintersmith was expecting a new, non-existing directory instead of an existing, current directory, so I appended --force.
$ wintersmith new . -T basic --force
To test it out, I ran wintersmith preview from the terminal and was greeted by the basic Wintersmith Hello World page on localhost://8080 from my browser.
Let’s take a look at the files Wintersmith generated (in addition to the ones I already had in the personal-page directory.
├── config.json
├── contents
│   └── index.md
└── templates
    └── index.jade
The config.json file, as the name implies, contains configuration options (like webpage title, wintersmith plugins, etc.). The contents folder contains all assets including images, JavaScripts, CSS, as well as the actual content, in the form of Markdown or JSON. Finally, the templates folder contains our page templates.
This is what the files look like right now:

Moving assets around #
I’ll go ahead and delete the contents of templates/index.jade and contents/index.md. I’ll rename index.md to index.json (makes it easier to have my data as key-value pairs), and, for now, this will be its new content:
{
  "title": "Osama Sidat",
  "template": "index.jade"
}
In config.json, I’ll change the title variable, nested under locals, to “Osama Sidat”.
Recall that from the old structure, I had the style and images folders. I’ll move these folders under contents.
Converting HTML to Jade #
I can either try and convert all my HTML in one shot (as a first step), or convert it bit by bit. Since I would like to make any corrections along the way, I’ll opt for the latter.
If I get stuck with any snippets, I’ll use the handy HTML2Jade.
The first part (upto the head tag) is easy:

I may come back and modularize this bit later (separate the meta tags and the stylesheets into their own snippets which I can simply include in index.jade.
The main-profile section #
The first part is pretty simple - more or less a direct conversion.
section.main-profile
      header
        .top
        .me
          img(src="images/osama.png")
          h2 Osama Sidat
          h6 Problem Solver
      ...
At some point, the name and tagline could be refactored into the index.json file, but not now.
Next, we have something a little more interesting (same section):
section.main-profile
      ...
      .social
          each account in page.metadata.social
            a(href="#{account.url}" title="#{account.title}" target="_blank")
              i(class="fa fa-2x #{account.iconClass}")
      ...
I replaced the repetitive markup representing my social media icons with a loop. The loop goes through every social media account and constructs the link and the corresponding icon (from Font Awesome).
The necessary data is now placed in the index.json file, contents of which can be called via page.metadata (this can be refactored later into a separate data folder, but for now, since I have everything on one page, and a single Jade template file, it doesn’t matter). Following is my update to the index.json file:
{
  ...
  "social": [
    {
      "url": "http://ca.linkedin.com/in/osamasidat/",
      "title": "Visit my LinkedIn Profile",
      "iconClass": "fa-linkedin-square"
    },
    {
      "url": "http://github.com/oosidat",
      "title": "Check out my GitHub Profile",
      "iconClass": "fa-github"
    },
    {
      "url": "http://www.facebook.com/osama.sidat",
      "title": "Vist my Facebook page",
      "iconClass": "fa-facebook-square"
    },
    {
      "url": "http://twitter.com/SammSid",
      "title": "Follow me on Twitter",
      "iconClass": "fa-twitter"
    },
    {
      "url": "http://instagram.com/osamasidat",
      "title": "Follow me on Instagram",
      "iconClass": "fa-instagram"
    },
    {
      "url": "http://www.flickr.com/photos/osamasidat/",
      "title": "Check out my photos on Flickr",
      "iconClass": "fa-flickr"
    }
  ]
}
I’ll finish up the main-profile section with the intro and the down arrow:
section.main-profile
      ...
      .intro
        p
          | Aspiring Software Developer, with a passion for solving problems.
          br
          | 4th Year Computer Science @ UWaterloo.
          br
          | Hobbyist Photographer. Tech Enthusiast. Culinary Experimenter.

      .down
        i(class="fa fa-angle-down fa-3x")
Note to self: the down arrow is a great candidate for a simple refactor using Jade’s include feature.
The blogs section #
After doing the social part above, I have a pretty good idea how to do the blog tiles.
section.blogs
      .blog-header
        .me
          h3 Blogs
          h6 I write about tech, cooking and life experiences
      .blog-content
        .tiles
          each blog in page.metadata.blogs
            a(href="#{blog.url}" target="_blank")
              .tile
                .tile-title=blog.title
                .tile-description=blog.description
      .down
        i(class="fa fa-angle-down fa-3x")
There was a redundant <div class="tile-links"></div> that I ignored during the conversion.
Here, I’m looping through the blogs array to get the link, title and description. I updated the index.json:
{
  ...
  "blogs": [
    {
      "url": "http://blog.osamasidat.com/",
      "title": "My Tech Thoughts",
      "description": "This is a new blog I started on Svbtle where I express my tech thoughts, including my development experiences, industry trends I follow, and the changes and improvements I strive to push for."
    },
    {
      "url": "http://blog.osamasidat.net/",
      "title": "Personal Blog",
      "description": "I started writing this blog at the end of my first term at the University of Waterloo. It started off with mostly my life experiences, but has now evolved to contain my culinary experiments (read: recipes) and the occasional photography article."
    }
  ]
}
The projects section #
Pretty much the same thing as the blogs section above.
section.projects
      .project-header
        .me
          h3 Projects
          h6 Demos of my code work
      .project-content
        .tiles
          each project in page.metadata.projects
            .tile-unlinked
              a(href="#{project.url}" target="_blank" title="#{project.hoverTitle}")
                .tile-title=project.title
              .tile-description=project.description
              .tile-links
                each link in project.links
                  a(href="#{link.url}" title="#{link.title}" target="_blank")
                    i(class="fa fa-2x #{link.iconClass}")
In this case, each project contains its title, URL and description, and also, an array of links (basically just two for now, the project site itself, and its GitHub repository).
Added the following to index.json (left out a couple of projects):
{
  ...
  "projects": [
    {
      "url": "http://rockslasersprofit.com/",
      "title": "Rocks! Lasers! Profit!",
      "hoverTitle": "Visit the Project Site",
      "description": "An Asteroid Prospector game developed for the NASA Space Apps Challenge 2014, which won the regional grand prize in Kitchener-Waterloo. The goal of the game is to mine as many resources as possible before fuel runs out.",
      "links": [
        {
          "url": "http://rockslasersprofit.com/",
          "title": "Visit the Project Site",
          "iconClass": "fa-external-link-square"
        },
        {
          "url": "https://github.com/oosidat/NASAHack2014-asteroids",
          "title": "Visit the Project on GitHub",
          "iconClass": "fa-github"
        }
      ]
    },
    {
      "url": "http://leaveanote.meteor.com/",
      "title": "Leave A Note",
      "hoverTitle": "Visit the Project Site",
      "description": "A simple experiment with the MeteorJS framework and MongoDB to create public sticky notes and share them in real-time with any visitors of the site.",
      "links": [
        {
          "url": "http://leaveanote.meteor.com/",
          "title": "Visit the Project Site",
          "iconClass": "fa-external-link-square"
        },
        {
          "url": "https://github.com/oosidat/meteor-leaveanote",
          "title": "Visit the Project on GitHub",
          "iconClass": "fa-github"
        }
      ]
    },
    ...
  ]
}
Recap #
Let me summarize what I did in Part 1 of my site renovation
What I did so far: #
- Created a Wintersmith project, moved my existing assets (images and stylesheets) accordingly
- Converted my old HTML markup to Jade code
- Used loops where appropriate to reduce code duplication
Unresolved Issues: #
- A small spacing issue on the social media icons. 10 minutes in the Chrome Dev console did not help me narrow it down. Since it is not impacting functionality, I’m choosing to let it go.
- Had to remove a link in one of my project descriptions when I moved it to JSON. I can probably embed a link in the JSON string. Keeping it as-is for now.
At this point, I’ve achieved (more or less) visual and functional parity between my new Wintersmith-based site and my old raw HTML site. In the next part, I’ll go through some updates in terms of content, refactoring and duplicate code reduction, before attempting to move the site to GitHub Pages.
Until next time!